6 Types of Backgrounds to Consider for Your Vivarium
Building a background can be as simple or complex (and time consuming) as you want.
Let’s go over several common approaches, giving an overview of each, with links to tutorial videos along the way.
We’ll go in order of difficulty, starting with the easiest of all, no background at all!
1. No background


Skill Level: ☆ ☆ ☆ ☆ ☆
Don't dismiss this as a possibility, as there are impressive vivariums without any background. Just look at the two posted above!
When considering not using a background, keep in mind the animals you are housing.
Emerald Tree Skinks, for example, are popular lizards and love to climb. Personally, I wouldn't consider a vivarium for these guys without a background on at least two sides. They constantly use backgrounds to climb around, and will even try to jump through the glass.
2. Background inserts

Skill Level: ★ ☆ ☆ ☆ ☆
Many main-brand glass enclosures come with foam inserts. They are not particularly attractive, nor are they useful for refuge or growing plants.
Depending on what you're housing, they can get behind the background or even tear it up and dig through it, so many people simply throw them away.
If you want something just as simple, but more durable and better looking, there are other options available.
There are companies that hand make inserts and sell them online. They look much better, are more durable, and can be made to custom sizes.
Universal Rocks and Aquadecor are both top-of-the-line options. They even sell standalone branches and rocks, so you can have everything match and look cohesive.
Another place to look is Etsy. I haven't tried this myself, so I can't recommend specific shops. If you've tried any of these, let me know about your experience.
Don't expect plants to grow on most of these, however. Although the materials are often quite durable, they’re usually not at all porous, don’t retain moisture, and don’t allow plant roots to penetrate.
For this reason, I personally think the best fit for this type of background is lizards and snakes that would otherwise destroy a delicately planted enclosure.
Watch a video by Oliver Knott →
3. flat backgrounds

Skill Level: ★ ★ ☆ ☆ ☆
If inserts aren't for you, this next method is almost as simple. We'll call these flat backgrounds for lack of a better term.
There are a handful of materials that would work well, such as coco fiber mats or tree fern panels.
You can simply cut them into the desired shape, and silicone them to the rear of the enclosure. The benefit of this over the previous method is that these materials will hold moisture and provide space for plant roots to establish.
Tree fern tends to be better at growing plants, but it's also much more expensive. To make it look more natural, you can break the panels into pieces and silicone them at various angles, almost like a puzzle. This will help avoid too many right angles in the background, which can make it look less natural.
These backgrounds may start off rather plain, but with high humidity and a bit of patience, the background can get covered in plants and mosses, eventually hiding various gaps and cracks.
Overall, this is a simple and effective approach that you can pull off with very little time and effort.
Watch a video by Reptiliatus →
4. Expanding Foam

Skill Level: ★ ★ ★ ☆ ☆
The most popular method for custom backgrounds involves expanding foam (Great Stuff is the most common brand).
It comes in a spray-foam can, and you can apply it to the back of the enclosure to create a base layer for the background. You’ll mostly likely want to use branches in your designs, and expanding foam is great way to secure them into place as well.
Once you have that base, you can further carve and shape it to the desired look shape. Foam is easily carved with a simple utility knife, or even a wire cutter if you’ll doing lots of carving.
After you have the desired shape, you’ll want to make it look more natural by covering the raw construction material.
To do this, you will apply layers of silicone in patches, and then press dried soil into it to give it an earthy texture. What I love about this method is you can sculpt it to any shape you desire, and it can be easily modified in the future.
However, there’s one main drawback to consider, in my opinion.
This method is poor at retaining water, making it difficult for plants like vines and mosses to grow on it. One solution is to use cork bark sheets to cover larger areas, and then use foam to join various areas together.
You can even use expanding foam to hold small plastic pots in place throughout the enclosure to aid with planting.
Utilizing plenty of cork bark and branches has the added benefit of making the enclosure feel more natural, too.
Watch a video by Elle’s Reptiles →
5. Compressed Cork

Skill Level: ★ ★ ★ ☆ ☆
A newer style gaining popularity, and currently our favorite approach, is using compressed cork panels, such as those from Zoro, typically used for insulation.
There are a couple of methods for using this material.
One approach is to silicone full sheets (opt for a thicker sheet for more variation) onto the background and sides, then “texture” the surface by extracting bark chunks with a screwdriver and your bare hands.
Another method involves pre-ripping the panels into chunks (though this can be messy) and then silicone them into place, one at a time. This results in a more 3D effect but requires significantly more effort.
Compared to the expanding foam method, we prefer the more textured and darker color of compressed cork.
Additionally, due to its texture, it can retain water in areas that receive frequent misting, making it more likely for plants to attach to it.
Biotope Gallery often uses compressed cork in many of their setups, so we recommend watching some of their videos for inspiration and guidance.
Watch a video by Mike Tytula →
6. Pumice rock

Skill Level: ★ ★ ★ ★ ☆
This method is more popular among terrariums than vivariums. However, I think it can work just as well for setups with “low impact” critters in vivariums like poison dart frogs or small tree frogs.
Pumice is a lightweight, porous volcanic stone. It’s about a quarter of the weight of granite, and the pores will hold a bit of water.
The rocks are cut in half to create lots of surface area, and then siliconed in place.
Since it’s such a soft rock, you can actually cut it easily with regular metal tools. Featherock (a brand of pumice) recommends using old or dull tools you don’t mind getting scuffed up.
After the rocks are siliconed into place, all of the gaps are then crammed with sphagnum moss.
The best part about this is how much moisture the background can retain. Vining plants and mosses will thrive because it’s so porous.
Being all natural materials, it has natural feel, too. Patience is key while the plants grow and surfaces are covered.
I haven’t used this method, but as I alluded to previously, I suspect that many reptiles like lizards and definitely snakes would dislodge the sphagnum moss, so just be aware of what tank mates you’re going to introduce.
Check out Planted Glass Boxes to learn more about this method. He even has a paid video course about it. See his pinned Story for more info.
Watch a video by InSitu Ecosystems →
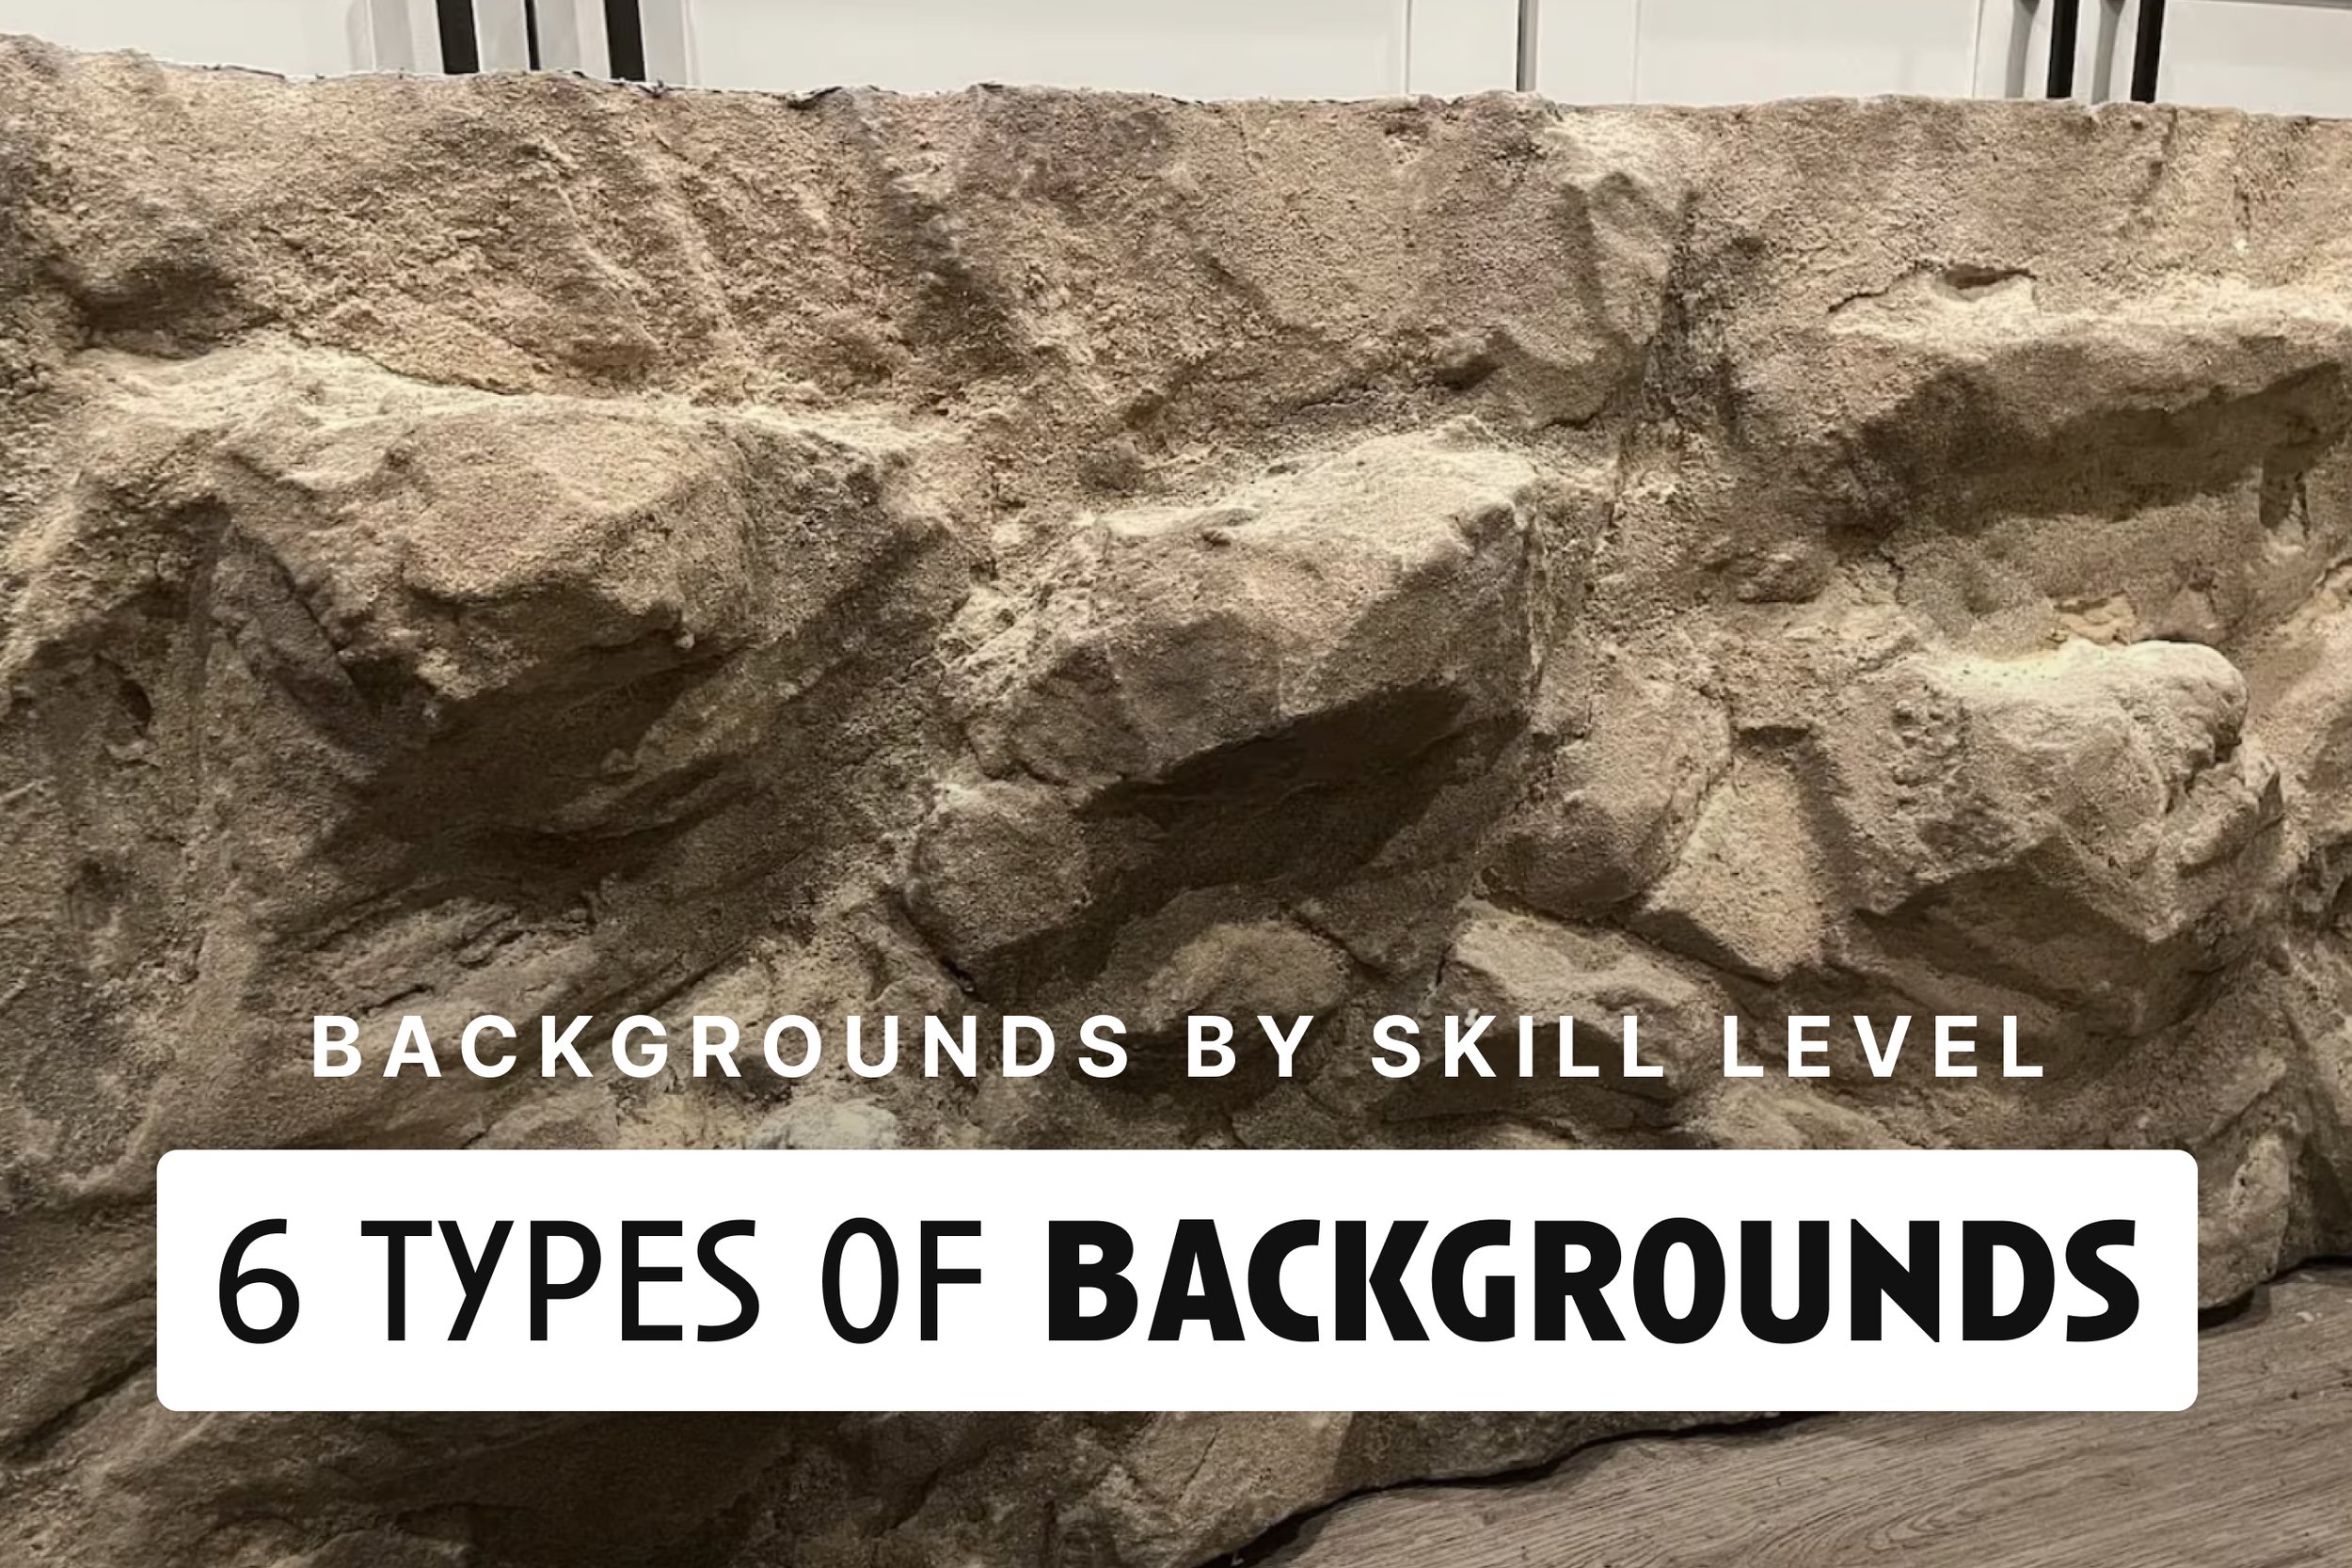
Bonus: Faux rock

Skill Level: ★ ★ ★ ★ ★
At the master class level, the most realistic and intimidating backgrounds are created by hand painting foam that is coated with concrete.
I haven't even experimented with this method yet, in part because it can get extremely messy, and I’m limited on space. (And to be totally honest, it’s intimidating!)
The basic premise is similar to the previous method, starting with sculpting foam.
Foam sheets are stacked, cut, and glued to quickly and cheaply fill in large areas, then carved back to the desired shape. Expanding foam is used for more detailed work, such as filling gaps and attaching hardscape.
What sets this method apart is that instead of using a layer of silicone to apply some sort of substrate, it involves coating the foam with concrete.
Fast-drying concrete, such as Drylok, is mixed and applied to the foam to give it a more natural and durable texture. When the concrete is still damp, patterns can be etched in for further refinement.
Many people start with a natural base color by mixing in color additives into the concrete.
Afterwards the final shape is painted to look natural using a whole assortment of techniques, ranging from airbrushing to filling spray bottles with heavily watered-down paints.
For some truly incredible vivariums using this method, check out the works of Daniel Konrad, Tino Anttila, and Mr. Monkey.
Watch a video by Natural Herp Keeper →
—
Creating a vivarium background can be a fun and rewarding process. With various methods available, there is no right or wrong way to go about building one.
Whether you choose to keep it simple or opt for a more intricate design, the key is to start with what you're comfortable with and build your skills over time.
Get the Guidebook 📗
Enjoyed this article? It's just a glimpse of what our comprehensive guidebook offers to kickstart beginners into the world of vivarium building. If you found this helpful, you'll love the depth and detail of our complete guidebook!