Build to Bloom: Watch a Paludarium Evolve Over 12 Months
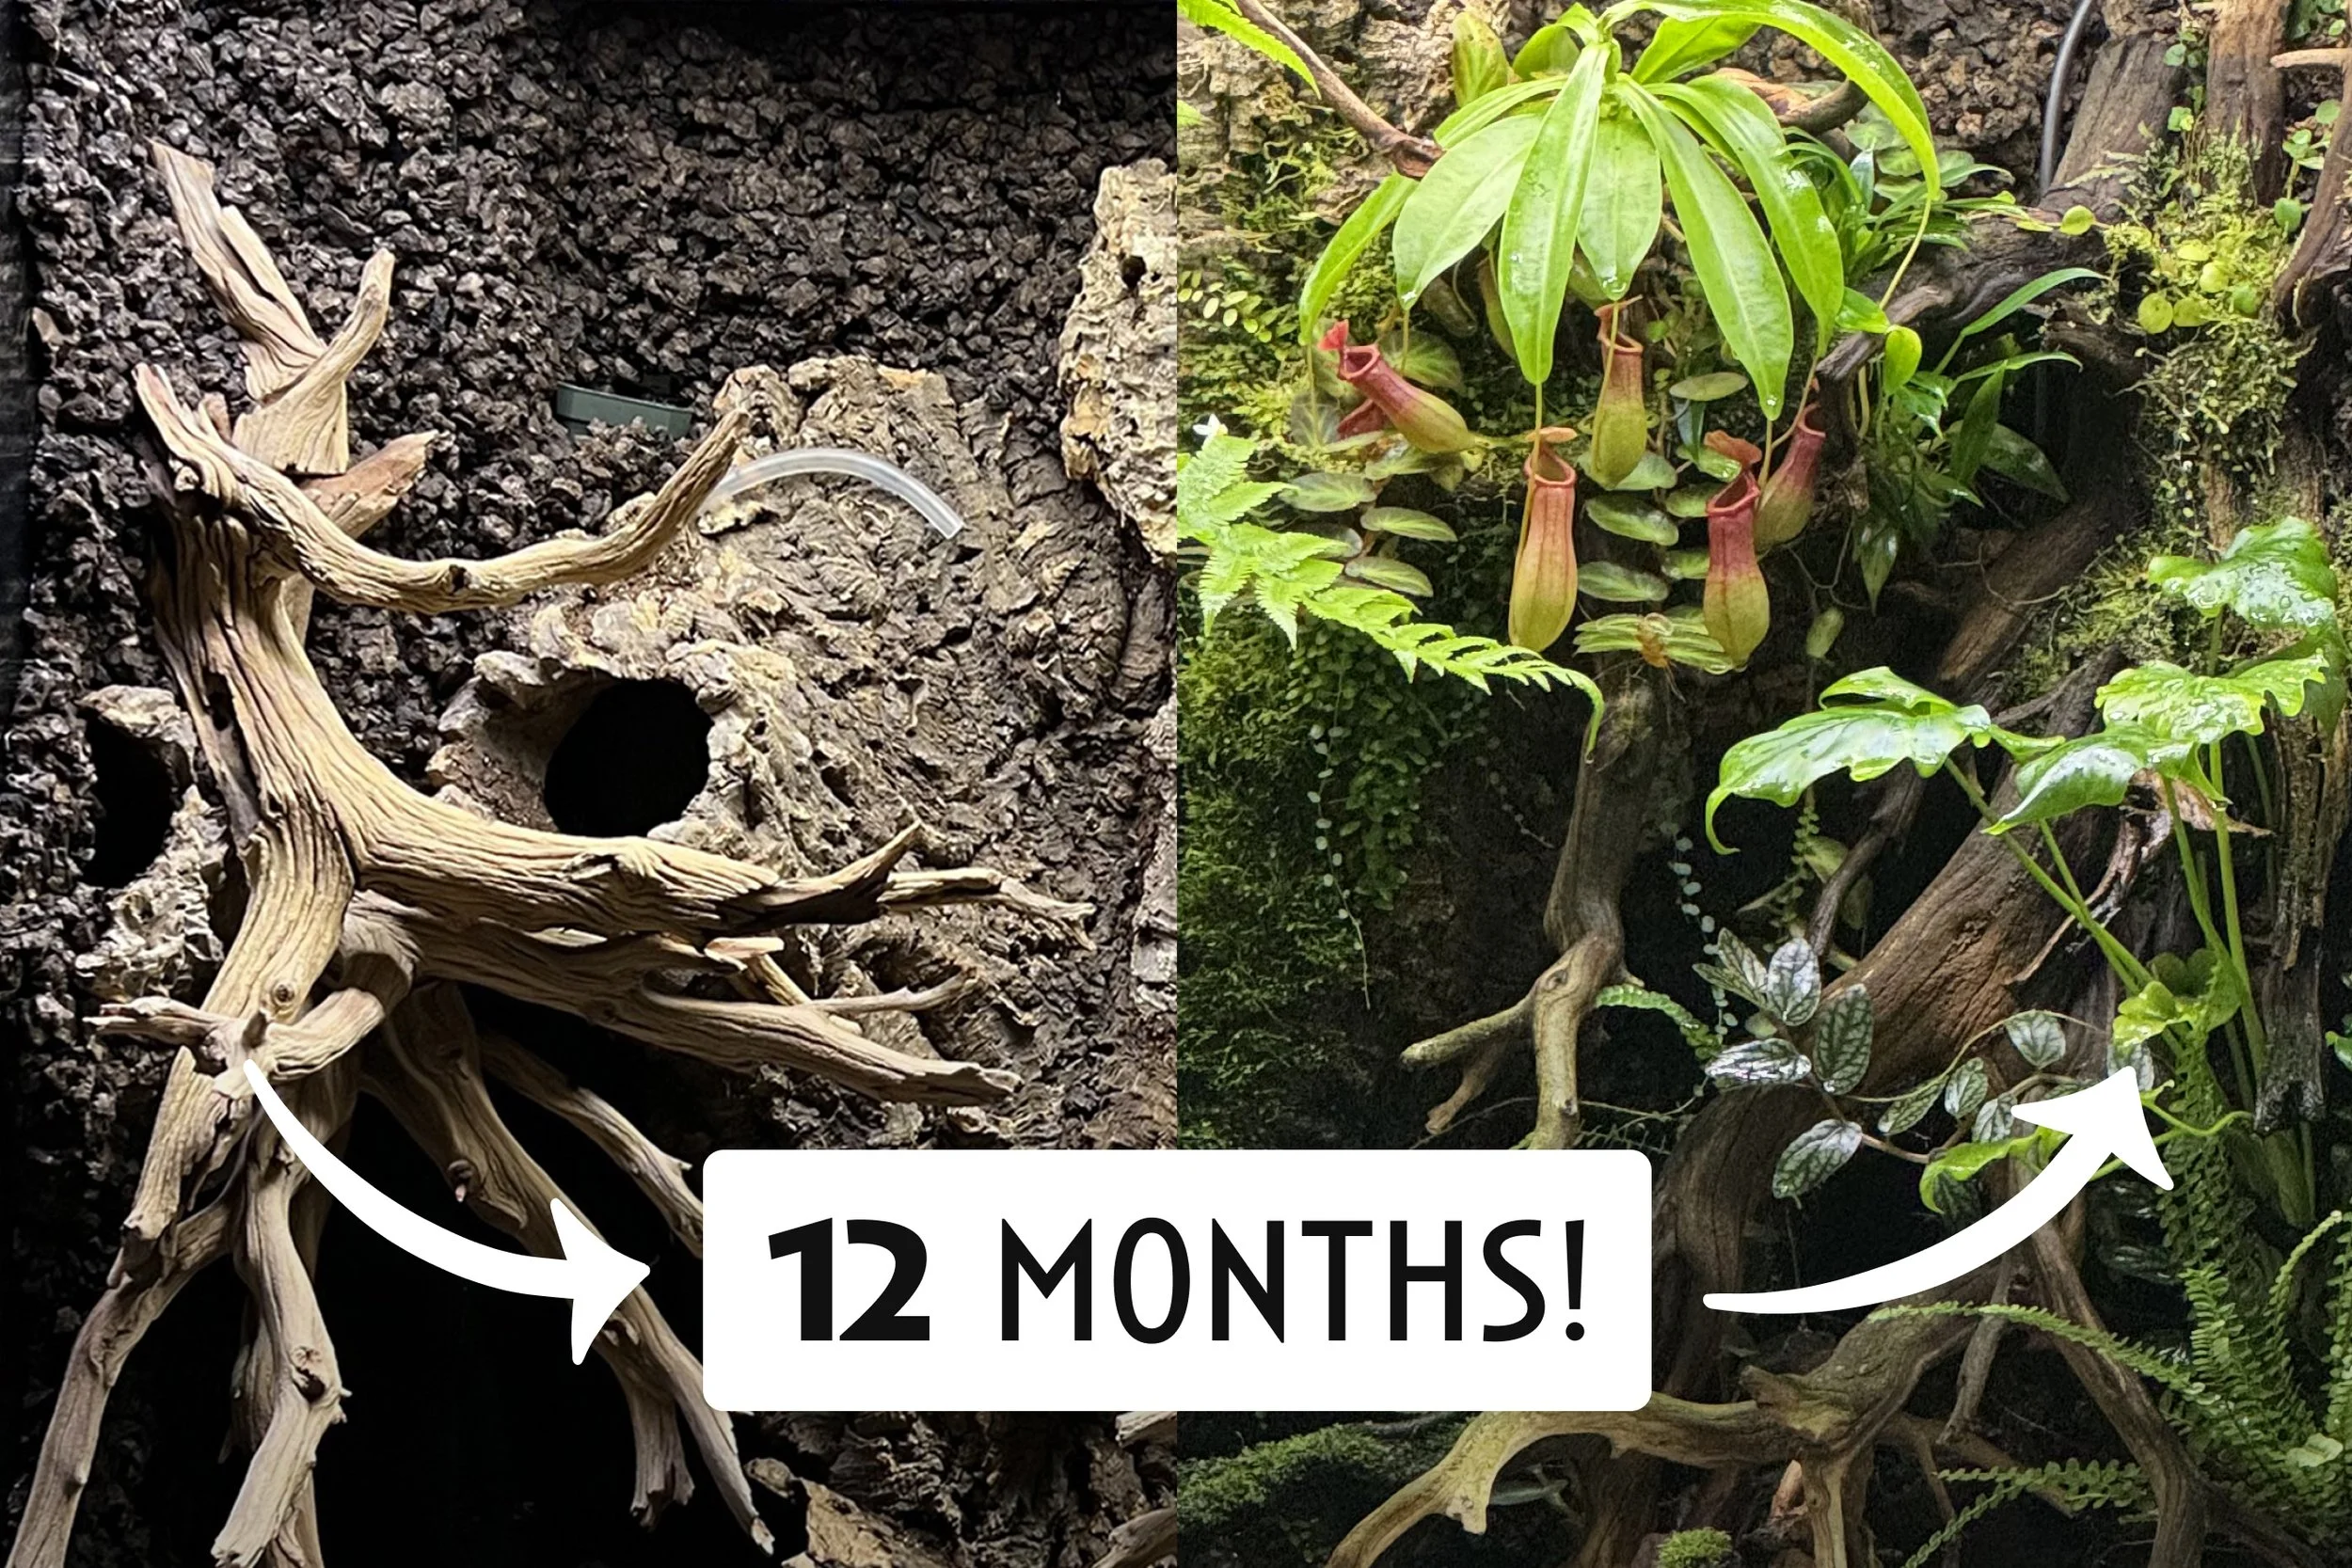
In this post, I've documented the progression of a paludarium over a period of 12 months, capturing its journey from inception to its current thriving state.
Continue reading to explore the intricacies of the vivarium's construction, plant selection process, and ongoing care practices to uphold a balanced ecosystem.
Let's begin with a photograph of the vivarium in its current condition.

And now, back to the beginning…
Initial Setup and Construction
This vivarium was constructed with the intention of providing an enriching habitat for my Amazon Tree Boa, Striker. Given his arboreal nature, I thought it was a good opportunity to incorporate a paludarium design featuring a trickling waterfall.
Designing vivariums for large inhabitants can present unique challenges. I challenged myself to create a balanced setup that not only meets the needs of the a suitable environment, but also maintains aesthetic appeal while minimizing potential damage caused by the snake.
❯❯ Learn strategies for constructing vivariums with large inhabitants
The design concept centers around loosely emulating the environment of an Amazonian habitat, with roots extending into a water basin.
Multiple hiding spots integrated into the background to provide Striker with a sense of security and comfort, especially while the plants reach maturity.


Ghost wood was chosen for its durability and suitability for supporting Striker's arboreal lifestyle. Unlike some snake species, such as Green Tree Pythons, Amazon Tree Boas prefer multiple points of contact for stability, making ghost wood an appropriate choice.
To facilitate water quality and filtration, a designated land area was created in the vivarium's corner, utilizing stacked sponge mats to house the pump for the waterfall.
This arrangement serves as a natural filter full of beneficial bacteria, ensuring optimal water conditions for Striker's well-being.
In preparation for maintenance requirements, an access area to the pump was constructed using black corrugated plastic sheets, providing convenient access for cleaning or replacement if needed (so far there has been no need).

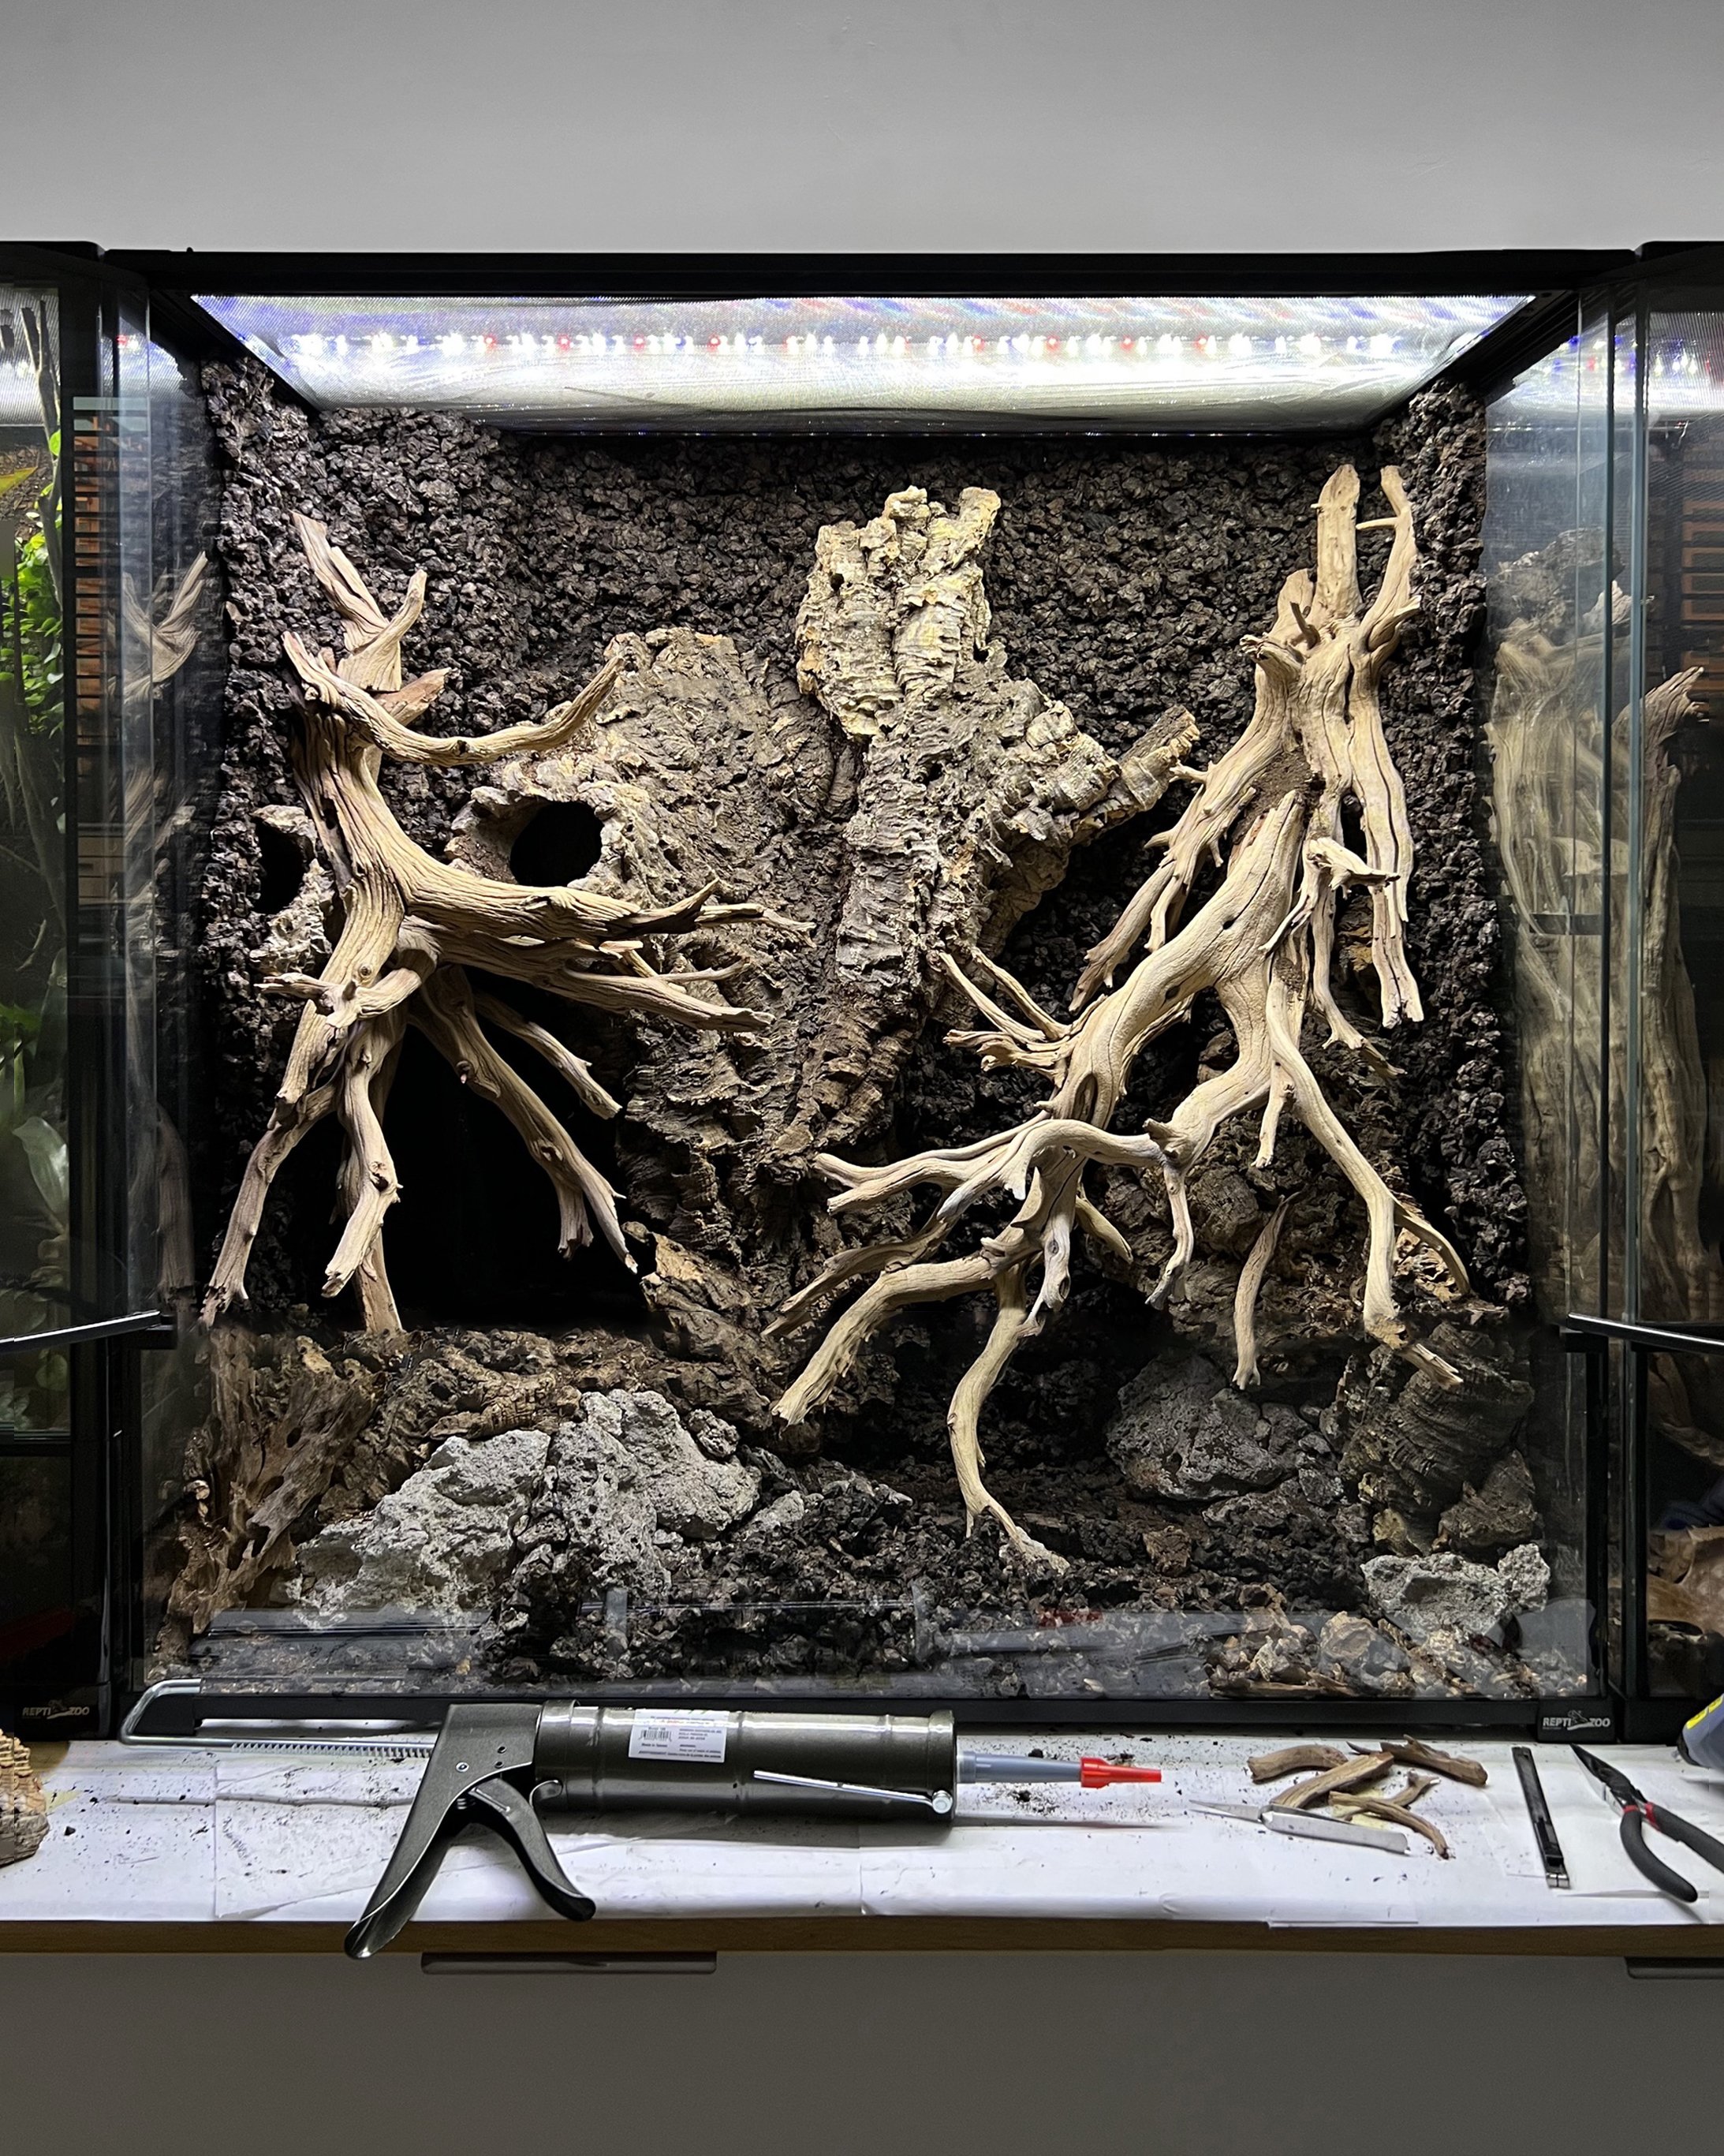
In previous builds, I've experimented with the expanding foam method for backgrounds. However, I've had challenges with background moisture retention to support plant growth, prompting me to seek alternative approaches.
For this vivarium, I tested a new background comprising a blend of cork bark flats and fragmented carbonized cork sheets. Although the construction process was meticulous, I believe that this approach is more aesthetically pleasing, and more effective in supporting plant growth.
❯❯ I’m creating a tutorial for this style of background. Join the newsletter so you don’t miss it!
Equipment used:
Initial Planting
Upon initial planting, you'll notice that this vivarium was kept sparsely planted.
I opted to try and exclusively use clippings from previous builds for this vivarium. This obviously offered financial savings, but I believe also contributed to a more natural aesthetic by allowing the plants to spread naturally.
While this approach requires patience, I've enjoyed the process of watching it grow in, and feel the end result was worth the wait. Over time, I gradually added more clippings to expedite the process of filling out the vivarium.
I made sure to incorporate a few small pots during construction for easy planting. Additionally, I utilized the natural curvature of cork flats attached to the background to create additional planting areas, filling them with soil and topped with sphagnum moss


In an attempt to achieve a lush green backdrop, I prepared a "moss smoothie" and applied it across the background and main branches. While the growth process was slow, I'm happy with the eventual outcome.
For this to be successful, it's important to maintain adequate moisture levels using sphagnum moss and regular misting.
Plant clippings included:
Begonia ‘Tiger Paw’ (Begonia rhizomatous hybrid)
Ecuador Peperomia (Peperomia emarginella)
Fluffy Ruffles Fern (Nephrolepis exaltata)
Lemon Button Fern (Nephrolepis cordifolia)
Oak Leaf Creeping Fig (Ficus thunbergii)
Philodendron 'Wend-Imbe' (Philodendron wendlandii/imbe hybrid)
Philodendron ‘Mini Midget’ (Unknown sp.)
Pitcher Plants (Nepenthes sp.)
Shingling Vine (Marcravia rectiflora)
Trailing Begonia (Begonia thelmae)
Trailing Watermelon Begonia (Procris repens)
Various mosses
the first few months
After patiently waiting for a couple of months, I introduced Striker to the vivarium. Although plant coverage was still sparse, he had access to several hides for security. It was interesting to observe him often hanging out in full display, as you can see in the first photo below.
During this period, I plants began their growth, indicating their successful acclimatization to the new environment.
Some clippings that I had casually placed on sphagnum moss had developed roots, firmly anchoring themselves. Upon closer inspection, small bits of moss had begun to sprout and emerge in various areas.
Fortunately, there was minimal die-off. The only casualty was a begonia, which wasn't entirely unexpected given its location. It appeared that the roots had become overly saturated and subsequently rotted.


To speed up the vivarium's greening process, I introduced additional clippings and some floating plants. However, the floaters didn't seem to thrive, possibly due to Striker's activity or insufficient nutrients. Consequently, I relocated them to a different setup, where they are currently thriving.
12 months of growth
Fast forward several more months, and we've reached one year since the initial planting.
As the slower-growing plants began to fill in, I removed the Begonia thelmae. While it initially helps to fill in the space with its rapid growth and near-constant blooms, it has a tendency to overtake the setup, and its older leaves rot fairly easily.
One unexpected addition to the vivarium was the emergence of a large fern near the top.
It's not uncommon for random plants to sprout unexpectedly, but what's interesting is this fern didn’t make an appearance until around the 8-month mark, and now is extremely fast growing.


Most importantly, I think this vivarium serves as a comfortable and suitable habitat for Striker. His robust activity levels suggest his well-being, and he appears to be strong and healthy.
Overall, I'm quite pleased with the outcome of this build. Though, with all builds, there are a few adjustments I'd make if given the opportunity to start anew.
Things I will do differently next time
Reflecting on this vivarium, there are several adjustments I would consider for my next build:
Increase the number of pots
In this build, I limited myself to only three main planting areas. Next time I will incorporate additional pots into the background during construction, providing more opportunities for easy planting.Start with more for plants
I knew that starting a vivarium with plant clippings was going to test my patience, so no surprises there. That said, I likely won’t go exclusively with clippings again in order to reduce time in the establishment phase.Sphagnum moss in the background
I would experiment with cramming sphagnum moss into cracks in the background to facilitate faster plant spread. Currently I have a couple of bare spots that I’m trying to fill in for a more lush and vibrant backdrop
—
What questions do you have about this build? What would you have done differently? Share in the comments below!