Drainage: 3 Popular Vivarium Drainage Layers, and, Do You Even Need One?
This section focuses on tropical vivariums. When creating a tropical vivarium, constant heavy misting can lead to an excessive accumulation of water at the enclosure's bottom.
To avoid saturating the substrate, it is essential to include a drainage layer that raises the dirt up by an inch or two, allowing excess water to pass through and accumulate below the substrate. Failing to do so can lead to bacterial growth, unpleasant odors, and an unhealthy ecosystem. You will want to drain the excess water periodically before it reaches the substrate.
However, if you're setting up an arid or temperate environment, a false bottom isn't necessary. You can simply fill the enclosure with the substrate of your choice and be done with it. For a tropical setup, such as one for poison dart frogs, a drainage layer is highly recommended.
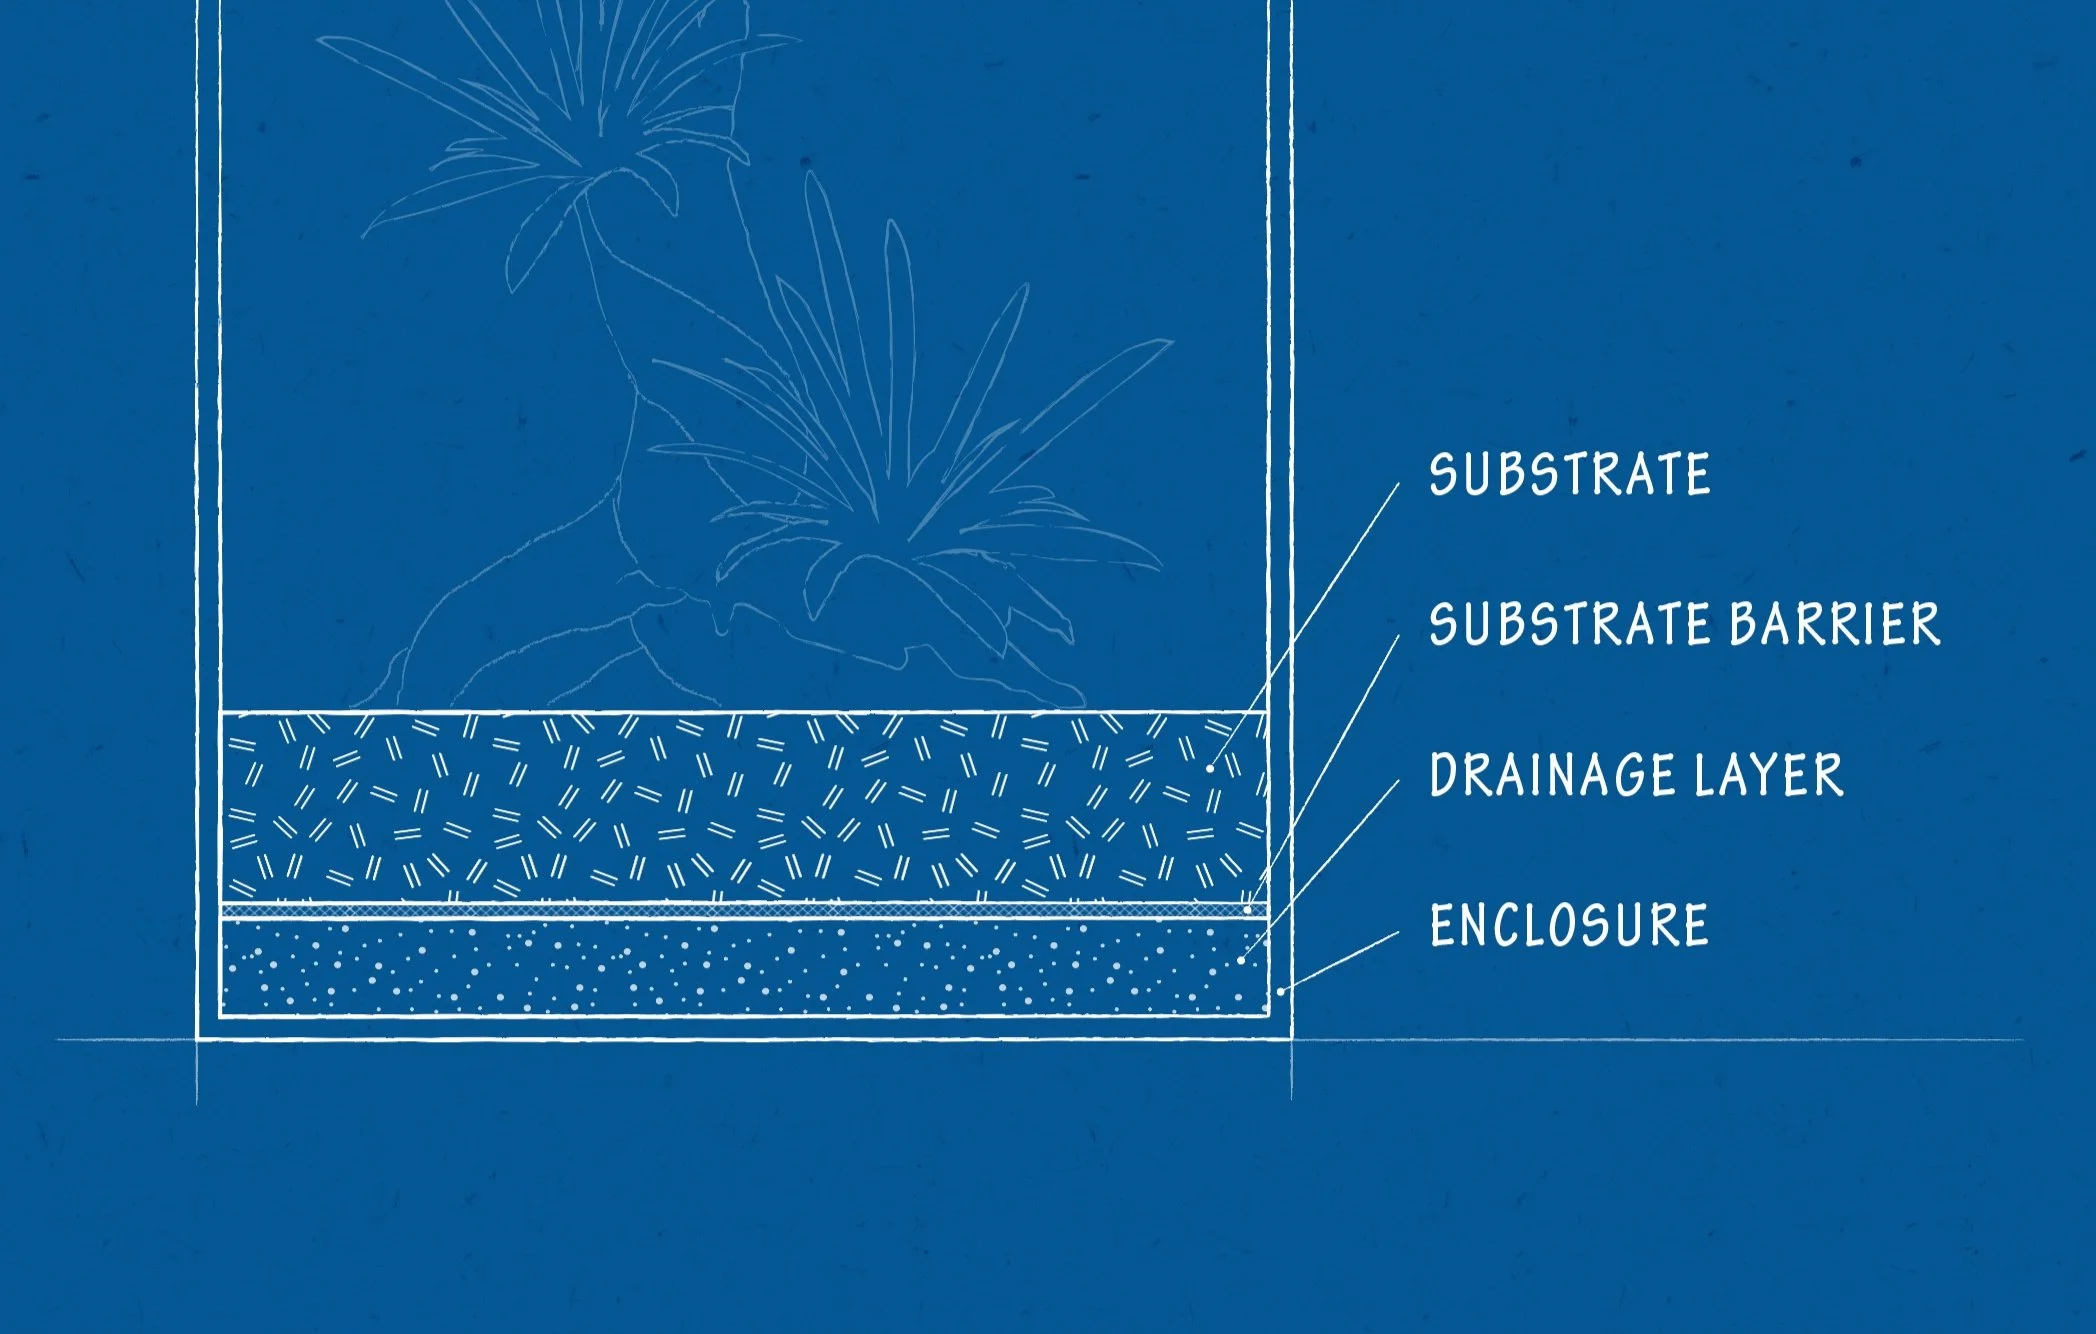
The general approach to building a drainage layer is straightforward. As shown in the diagram above, the bottom of the vivarium should be reserved for the drainage layer, and the substrate should be placed on top of that, with a substrate barrier in between to keep them separate. Let's explore a few methods to build this system.
Leca

The easiest method is a layer of leca balls, which stands for lightweight expanded clay aggregate. These lightweight balls of clay provide ample gaps for water to accumulate.
To use this method, simply pour 1 to 2 inches of leca directly into the bottom of the enclosure, lay down your substrate barrier on top (which we’ll discuss shortly), and then add the substrate.
The main benefits of this method are its simplicity, speed, and light weight. In the past, I have seen people use gravel for this purpose, but avoid doing so because even a couple of inches of gravel can make a small vivarium surprisingly heavy.
While it is a specialty product that may not be available at all big-box stores, you can purchase leca easily online from Amazon or any vivarium supply shop.
Egg Crate

Years ago, most people would use egg crate louvers/diffusers. Egg crate is made from a durable plastic that is lightweight and usually sold in 2ft x 4ft sheets, although other sizes are available.
To use this method, you will need to cut it with snips to match the interior size of the enclosure and create small pedestals to elevate it to the desired height. The pedestals can be made of more egg crate, or you can simply cut some PVC tube into short sections and lay them on their sides. It's best to zip tie the pedestals to the egg crate.
While this method works, I find it to be more work than necessary. I also don’t like the look of seeing white egg crate through the front of the enclosure, so you may want to consider purchasing black egg crate to begin with or applying spray paint to hide it.
Sponge Mat

This is currently my favorite method. You can find large sponge mats in rolls online. Simply cut the sponge to fit the bottom of the enclosure and lay it in. Some people will silicone it in place, but if you are filling the entire base of the vivarium that’s not necessary.
This method is almost as easy as pouring in a bag of leca, but it looks better in my opinion. You can even cut various pieces to help build slopes so you can use less soil, keeping the vivarium lighter too.
An added benefit when used in paludariums is that the sponge provides both mechanical and biological filtration as water runs through it.
Substrate barrier

Regardless of the method you choose, make sure to place a substrate barrier between the drainage layer and the substrate. This will prevent too much substrate from falling into all the cracks, defeating the purpose of a drainage layer.
Most online vivarium supply shops sell specific substrate barriers, but some regular fiberglass screen mesh will work just as well. It's helpful to make this oversized to minimize gaps around the edges.
Removing Excess water
You may be wondering if the water level will continue to rise and eventually reach the substrate. Indeed, this is a possibility, depending on how much and how often you mist your vivarium.
To avoid this problem, it's important to plan ahead and include a way to remove excess water. There are a few ways you can do this.
Syphon Manually

When you're building the drainage layer, consider placing a PVC pipe, or something similar, that extends from the bottom of the vivarium through the substrate barrier and into the substrate. Cover it with a cap to prevent substrate from falling through.
Later, when water accumulates, move aside some of the substrate to uncover the drainage hole, and use tubing to siphon out the excess water. You can easily cover the hole with a bit of substrate or hide it with hardscape or plants when it's not in use.
Bulkhead Fitting

Another option is to install a bulkhead fitting with a shutoff valve. This requires drilling a hole through the back panel of glass, but several glass enclosures now come in a "paludarium" version with pre-drilled holes and the necessary fittings and tubing. Watch this video to see it in action.
The beauty of this system is that you don't have to dig around or disturb the substrate and plants. The valve can be left open for a constant overflow of excess water into a container below, or you can close the valve until you're ready to drain the water, then place a bucket underneath.
By planning ahead and incorporating one of these drainage systems into your vivarium, you can ensure that excess water won't harm your plants or substrate.
—
In summary, building a drainage layer for your vivarium is an essential step in creating a healthy and sustainable environment for your plants and animals. There are various methods to approach this task, including using leca balls, egg crate, or sponge mats. Whichever method you choose, don't forget to add a substrate barrier to prevent soil from falling through the gaps.
Additionally, make sure to plan ahead for excess water removal through either manual syphoning or installing a bulkhead overflow system. With the proper drainage layer in place, you'll be on your way to a thriving ecosystem in your enclosure.
Help me improve these guides by reaching out with your questions and comments.
All guides, or continue…